
Paving stones create a stunning environment almost anywhere. They’re a gorgeous, low-maintenance alternative to concrete slab patios, walkways, and many more. However, it may be daunting when you consider beginning a project for a hardscape or attempting to install pavers by yourself.
Before installing pavers, be sure of the definition of hardscape and what it’s intended to serve. Also, be aware of the common pitfalls to avoid these as often as you can. This post will discuss both and break down the paver installation steps needed to install pavers safely and efficiently.
Paver Installation
-
Design Patio
Pavers for patios will only last as strong as the base they are placed on. It is necessary to have a 5-inch layer of crushed paver base or gravel. This is and then a layer of 1″ of paver sand. The pavers are placed on top of the sand, then the polymeric sand is swept into the gaps between the pavers. The patio’s length and width, multiplied by your required depth of the material, will inform you of the amount of gravel base and sand you need to purchase.
- The width and length of your site (area) are a part of determining the amount of pavers to buy. Your choices of patterns may either increase or decrease the amount. Simple brickwork or grid patterns require the least amount of pavers. However, intricate designs like herringbone or pinwheels need more pavers.
2. Check on Permits and Utilities
Contact your local Call Call-Before-You-Dig hotline to arrange an appointment with a technician who will visit your house and trace the soil for gas, electrical, sewer, or other sensitive lines. Contact the neighborhood Building Permit Office to determine if you require permits to complete your construction.
3. Stake Out Work Area
Set a stake at every corner of the planned patio. The twine or string should be woven through the stakes to create a square or rectangle. With a tape measure, take two intersecting diagonals in the patio area to verify whether it is square. If both diagonals are of identical length, then your space is square (meaning that each of the four corners is set at 90°). Done right, services can do all these tedious tasks.
4. Dig Patio Perimeter Area
You can trace the entire patio area by opening about 6 inches over the string that marks. If you want to cut into the grass, employing the landscaping edger, an elongated, flat tool similar to a shovel equipped to cut straight lines through the grass, is helpful. But you can also make use of a spade as well. Create a channel around 7 inches deep.
Once the perimeter is established, you can remove the marking string but remain with the stakes.
5. Dig Inner Patio Area
- Take the turf or soil from the area around it and dig down 7 inches. Place the undesirable materials in the wheelbarrow and eliminate them into the compost bin or other yard area. Ensure you check the depth frequently because you want to ensure that it is as close to the 7-inch mark as possible.
6. Add Landscape Fabric
Take a swat of any stray tree roots. Get rid of sharp or large rocks. Use your hand-tamper or the rental plate compactor to break down the soil around the patio. After that, you can roll in two sheets of landscape fabric in a row, with the top layer set at 90 degrees to that of the lower layer. Spread the patio’s perimeter approximately 4 inches.
7. Add Gravel Base
Wear a dust mask. Pour about 2 inches of gravel base material onto your patio. Spray it lightly, then flatten it. Two layers are added, each about 2 inches high.
As you add these successive layers, slop your patio to encourage drainage. The slope should have an angle between 1.4% (vertical about the horizontal). Examine the hill using your bubble. Make sure the mountain is not straying away from the house.
8. Add Sand Base Layer
The final bed will be made of sand, providing a comfortable place to place and adjust the pavers. Begin by rolling out an area of landscape fabric over the base gravel to stop the sand from moving through the rock.
For a perfect 1″ depth of sand, lay 2 lengths of PVC pipe in a straight line parallel to each other and approximately 6 feet apart—Spread sand on the pipes, encasing the pipes.
9. Screed Sand Base Layer
Place a scrap of two-by-four on the edges of PVC pipes, and then you can screed it in the gentle raking movement. The sand will shift towards the side and then on top of the board. Keep moving the PVC pipes and screeding until the whole area is completed. Finalize by tamping the sand in a backward direction to cover the footprints. A small splash of water can help the sand settle down and firm up. Let Done right to help you with these measurements and installation.
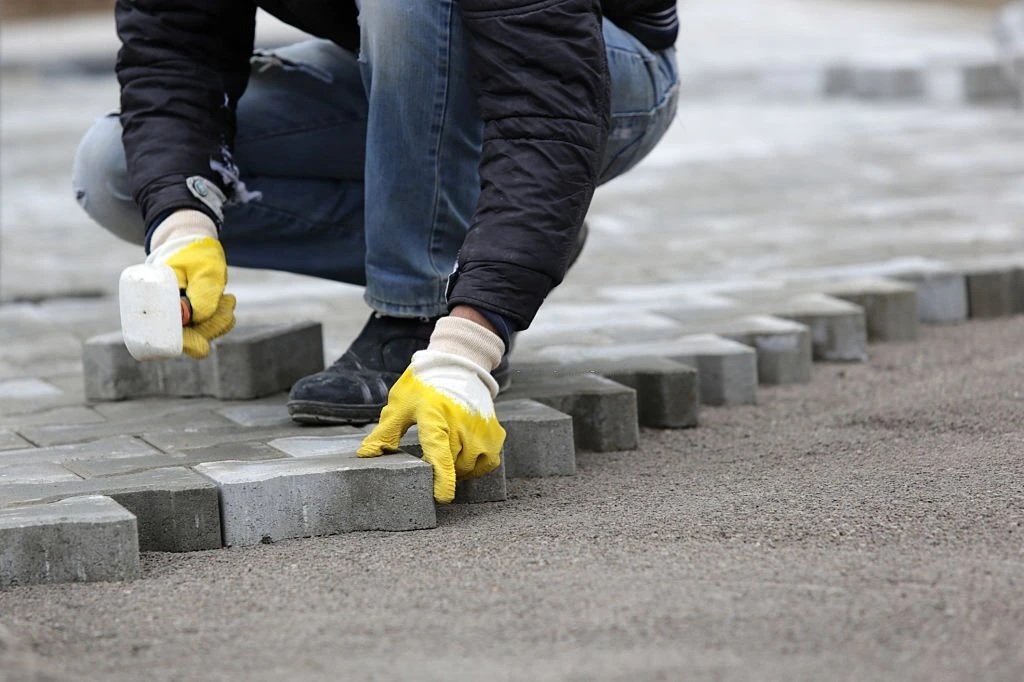
10. Lay Patio Pavers
- Attach the marking string again onto the stakes. Start your pattern on the outer edge of the perimeter. Place each paver stone on its flat side into the base of the sand.
- Begin by tapping gently with the mallet of rubber or Hammer and an additional scrap of two-by-four to prevent breaking the paver.
- Set the pavers in a way they are spaced 1/4-inch from one another.
11. Cut Patio Pavers
You may be required to cut a few pavers to match the dimensions of the surrounding area. If this is the case, using a hammer and a masonry tool is the easiest method.
Put on your safety glasses, and also wear hearing protection.
Create an establishing line on the paver’s face using an edge of straight metal and the chisel’s edge. Use the chisel to draw across the paver, similar to cutting cardboard using a utility knife.
Take off the straight edge and use the chisel or Hammer to make the groove deeper to around 1/8-inch.
The chisel should be placed in the groove.
Then, lightly rap the Hammer across through the entire length until the paver is broken into pieces.
12.. Add Plastic Edging for Paver Installation
- Install the edging made of plastic around the border and your area. Attach the frame on the floor by hitting the spikes included with a mallet or Hammer, spacing the ends by about 12 inches.
13. Add Polymeric Sand
- Spread the polymeric sand all over the surface of the patio pavers. They are alternately moving the sand over the pavers. Continue adding sand and moving until the spaces between the pavers have been filled.
14. Add Water to Polymeric Sand
- Before adding water, removing all polymeric sand from the pavers’ top is crucial. If you don’t, the sand can bond to the paver surfaces and scratch the pavers. Utilizing a leaf blower is the best method to remove sand without having to remove sand from the gaps.
- Set the spray nozzle to light mist and apply the spray to your paver patio. Be careful not to soak it with excessive amounts of water. Otherwise, you have the possibility of removing sand from the cracks.
15. Wait For Sand to Set
Give it about 24 hours to allow your patio pavers to be installed entirely. Remove the landscape fabric using a utility knife.
Paver Driveway Cost Florida
As per Home Advisor, building the patio with bricks or pavers is an average cost of $3,400, ranging between $2,400 and $7,000 for a typical area of 280 square feet. You can spend between $8 and $25 for each square foot.
Enjoy Your Brand New Pavers!
It’s time to get your chair, pour a cold lemonade drink, and enjoy your work. You’ve just completed your DIY paver installation at your home! If you’d leave all the lifting (and digging and paver installation) to experts, Done Right is here to assist you!